In this article, master tells you all dark magic spells he learnt during his adventure as a miniatures lover and sculptor. This dark magic to be used at your own risks…


Hay ! This article is intended to contain affiliate links. Purchasing licenses through the links won’t charge you more, but we will take comissions and it’ll help us grow the marketplace.
In the rapidly evolving landscape of digital art and design, generative tools are carving out significant opportunities for creativity and efficiency.
This series of articles aims to provide an accessible overview of these innovative technologies, shedding light on their capabilities and potential applications. While we won’t delve into the technical intricacies or provide step-by-step tutorials, our goal is to serve as an eye-opener to the fascinating possibilities that these tools present.
Deep learning algorithms to generate base meshes for sculpting

When starting new sculpts, the first overall shape you make as a base will most often tell the quality of the end results. A good base volume will not always bring you the best results, but a bad one will surely turn your end result to be another miniature to put on a spike or in a cage as a décor for an undead cemetery.
And yes, getting a a good base-mesh is hard. Some can be downloaded or bought online and will make you save a lot of time. And the rest of the time you’ll have to make it yourself.
In this article, we will see how you can use PIFUHD, to create human base-meshes for your sculpts.

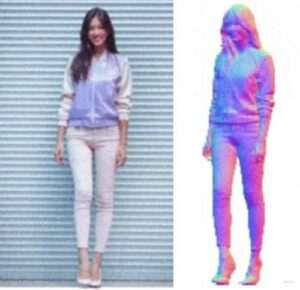
PIFuHD is a Multi-Level Pixel-Aligned Implicit Function for High-Resolution 3D Human Digitization (CVPR 2020)… holly molly…
Basically, it was created in 2020 by Shunsuke Saito, Tomas Simon, Jason Saragih, and Hanbyul Joo, and it is a python software that employs advanced deep learning algorithms to analyze input images and create 3D models that accurately represent the subject’s shape, pose, and appearance. It can even create a 3D model of any human from a single photograph, and that’s amazing !
The tool needs a high GPU to run, but don’t worry, you can still access it via a demo available on a google collab platform.
If you want to learn all about it, you can find the researchers article on Github:

Hey you ! If ya got time on your hands, how’bout you try generate images of DnD Heroes on your favourite generative AI tool, and then you feed the image to that PIFuHD tool to see what creature you can bring to life ?
Digital and playable isometric terrain

Sounds tricky, but trust me, you don’t need any line of code to create awesome digital maps to spice up your next DnD parties !
All you need is:
- an AI generative tool, for creating isometric assets (some are free !)
- a tool to retouch images or easily remove backgrounds (some are free !)
- and a digital whiteboard to construct your board and start playing (and yes, some are free !)


1 - Generate your isometric assets:
You can log into your favorite generative AI tool to start generating isometric assets. If you have never done this before, here are a few tips:
You can create an account on LEONARDO.AI.
It usually takes only a few minutes. Some functionalities are still in BETA, and you might be required to post a link on facebook to get your access to the BETA activated. Then, under the image generation tool, simply choose a generation model, write a prompt describing the kind of asset you are looking for, and start generate !

PLEASE NOTE:
Leonardo.ai is a powerful tool with a bunch of settings you can play with to impact the generation output. You will have a certain amount of free credits everyday, and a generation will cost you credits depending on the settings you will use.
What is important to know for generating isometric assets:
- Some models are specifically trained to generate isometric assets, and some won’t give convincing results. You can play with different models, but if you are struggling to get good results with one model, just switch to another.
- The keywords used in the prompt are of great influence, choose them wisely, but remember: keep it simple. A complex prompt will increase the randomness of the results. You can use words like “isometric game assets” or “Gamedev” or “DnD” to clearly set the focus on what you are creating. Then adding words like “digital illustration“, or “minimalist“, or “realistic” will greatly influence the artistic style you are trying to achieve. Finally, adding “white background” will help you sqve some time in the image cleansing once you get further in the process. (And yes, I could have used that in the next examples… but hey we learn from our mistakes !)
To make you save some time, here are the settings I used to generate the isometric assets for the map seen above:
- Size: 720 x 720 px
- Example of prompt: “gamedev platform isometric assets of various grass tiles”
- Finetuned model: Leonardo Diffusion XL


And here is another example:
- Size: 720 x 720 px
- Example of prompt: “Gamedev platform isometric assets small houses and water pound”
- Finetuned model: Leonardo Diffusion XL
IMPORTANT:
Every image that is generated in Leonardo comes with a seed number. This seed is a unique number that initialises the image generation process, and it contains information about the style and data used to create the image.
So once you have generated an assets sheet that feels like the right one, do not hesitate to use its specific seed number with a different text prompt to generate other assets with a very similar style and feel.

2 - Remove background and isolate each asset
Now, you need a little bit of time and skills to remove the background colour from your previously generated assets sheets. You can use your usual tool to do this. If you don’t have any, you can use PHOTOPEA which is a great easy to handle free alternative.


3 - Craft your digital terrain
Now that you have a set of awesome isometric tiles, you can assemble them to craft all the digital maps and terrains you can imagine.
- If you are planning on printing your terrain for playing it with friendly adventurers, you can use the same tool as earlier to assemble the tiles on a canvas of the desired map. You can then export the whole map as an image or a PDF file.
- Now, if you are a bit geeky like me and you like to have your little maps playable online on a digital board, I highly recommend that you use an interactive whiteboard tool. I will tell you more about my favourite one in the next chapter !
For my digital playable maps, I use the tool MIRO. You can find it here: https://miro.com/product-overview/
Miro is a versatile online collaborative whiteboard platform, and it has emerged in my opinion as a game-changer in the realm of Dungeons & Dragons, bringing a new dimension to the tabletop role-playing game we all know and love. With its expansive digital canvas, Miro transcends geographical boundaries, allowing D&D enthusiasts from all corners of the world to come together and embark on epic adventures.
You can use Miro’s infinite board as a virtual tabletop, where you can upload and interact with your intricate isometric maps (yes, the one made with the tiles we crafted earlier), breathing life into your fantastical landscapes and dungeons. The interface is very intuitive and enables easy navigation, panning, and zooming, ensuring every detail of your meticulously crafted worlds is just a click away.
But Miro isn’t just about maps. If you go further in understanding its abilities, you can integrate custom decks of cards, customisable icons, manage your character sheets… your imagination is the limit!
And let’s not forget about the dice! Miro has a lot of free plugins and some of them allow for digital dice rolls, ensuring that luck, chance, and the whims of fate remain an integral part of your gameplay.
In essence, Miro transforms the D&D experience, merging the tactile charm of traditional tabletop gaming with the convenience and connectivity of digital technology. It’s not just a tool; it’s a portal to a world of collaborative storytelling and adventure that’s limited only by your imagination.

Wow that’s looking good, how’bout ya use the same tools to create a kick-ass deck of cards, some small isometric adventurers and some weapons icons and you’re good to stay up all night!
IMPORTANT:
When assembling your tiles, please remember that the tiles you import first will be the tiles that will be displayed “behind” the others. The last imported one will show on the front.
So, when building your terrain, I would suggest to start from back to front, and from right to left.
You can also rearrange the tiles by changing their position using the bring forward or send backward options.
One last thing, if you are satisfied with the map you have just created, saving the whole map as one single image is a good practice! As the output file will be lighter, and will prevent your computer from lagging or the rendering from being slow.

That all for now… If you like master’s black magic tricks, you can ask master tell you more in further articles! Him can go in details for a specific topic. Me know he created decks of cards and character sheets with same spells…
